Bandai - 1/72 scale Y-Wing Starfighter
In both cases I had mentioned that the X-Wing and TIE fighter kits looked fairly complex, which is why they both sat on the shelf for extended periods of time. But they had paled in comparison to how complex the Y-Wing looked while I was leafing through the instructions and attempting to decipher the sprues. Most horrific was a whole sprue just for various pipes. I was not looking forward to that. Nevertheless, I pulled on my big boy trousers and got to work with assembly.
Cockpit and Pilot

As always with these kits I started with the cockpit and pilot. Unlike the X-Wing and TIE fighter in this kit I had a choice of pilots. Either one as depicted in A New Hope with the orange suit, or one briefly seen in Return of the Jedi with the grey suit. I elected for the latter, so I clipped them out, cleaned it up and primed them with Colour Forge Standard Grey. As is tradition, I will also be thinking up a name and backstory for my pilot.
I started off by painting the flight suit with Jokaero Orange and the small patch of skin with Vallejo Dark Fleshtone. I then painted the helmet, gloves, boots and vest with a couple thin coats of Ulthuan Grey. I then picked out the buttons on the front of the flight suit with Macragge Blue and Mephiston Red. To keep things simple I washed the whole miniature excluding the visor with Army Painter Dark Tone, I’d save the enamel washes for later in the build. For the visor itself I simply painted in a small amount of Iyanden Yellow contrast paint.
In preparation for decals I gave the helmet a coat of gloss varnish. I then carefully cut out the helmet decal and soaked it in a bit of water and dabbed some Micro Set onto the area where the decal would go. I then slide the decal from the paper backing onto the model, using a bit of paper towel to wick away any excess water. In order to get the decal to conform to the shape of the helmet better I gave it a coat of Micro Sol, a slightly stronger solvent than Micro Set, waited a few minutes then used a damp paper towel to press the decal into shape. I repeated this process until the decal was completely flush with the helmet. I then sealed it down with a coat of matt varnish.
With the pilot done I got to work on the rest of the cockpit. I clipped out the bits and tidied them up. In order that I could slide the pilot into the cockpit later, I kept the bits separate before priming them with Colour Forge Standard Grey.

As there wasn’t a chance I was ever going to even attempt to use the decals for the cockpit I instead kept things simple, like I did for my other Star Wars builds. I picked out some of the buttons with Macragge Blue and Mephiston Red before giving it a wash of Army Painter Dark Tone. Then to bring out the texture, I drybrushed the button panels with Necron Compound.
I figured that I would be brave and get the transparent canopy done early rather than leaving it until last like I did for the TIE fighter. So I clipped out the parts, including the laser cannon that sits on top of the canopy, and tidied them up. I then used some Tamyia Masking Tape to mask the windows, using a cocktail stick to press the tape firmly around the inner edge of the windows and then using a sharp hobby knife to trim away the excess. I then stuck some Blu-Tack onto the interior of the canopy, just to really minimise the risk of accidentally getting some paint on the inside.With that done I carefully primed the canopy with Vallejo Grey Primer. As said primer is a little closer to white than grey, in my opinion, I figured that it would make a decent basecoat. For the laser cannon I primed that with some Vallejo Black Primer and then gave it a basecoat of Scale75 Thrash Metal.
Moving swiftly along I gave both the canopy and cannon a thin coat of Army Painter Gloss Varnish. Once that had properly cured I then pin washed the recesses of the canopy with Ammo Black Wash. As it’s an enamel wash it flowed easily into the recesses, the smooth surface of the gloss varnish helping to pull the wash along by capillary action. I could then come back with a brush dampened with white spirits to clean up any spillages. The cannon on the other hand I gave an all over wash with Army Painter Dark Tone. Once everything had fully cured I sealed everything down with a coat of Matt Varnish.
Fuselage & Engines
With the cockpit done I could move onto the rest of the model. Aside from not glueing the now completed cockpit in place, I followed the instructions building the model. I may have to get creative with a craft knife and file later but it looked fairly simple to slide the cockpit in at a later date.
But that was a bridge to be crossed later. For the time being I got stuck into the build, going section by section. Like the pilot, I had a choice of which astromech I wanted, either a R4 or a R2 unit. As I had used an R4 unit for the X-Wing I chose the R2 unit for this build.
Like the X-Wing came with some red plastic bits for the squad markings, the Y-Wing kit comes with some yellow plastic bits that slot in around the cockpit by way of squad markings. Unlike the X-Wing, this part doesn’t follow the panel lines. And as I would be making my own markings I did my best to blend the gaps in with the main body. It wasn’t perfect but it would have to do. Aside from that things went pretty smoothly. Until I got to the pipes.
The damn pipes.
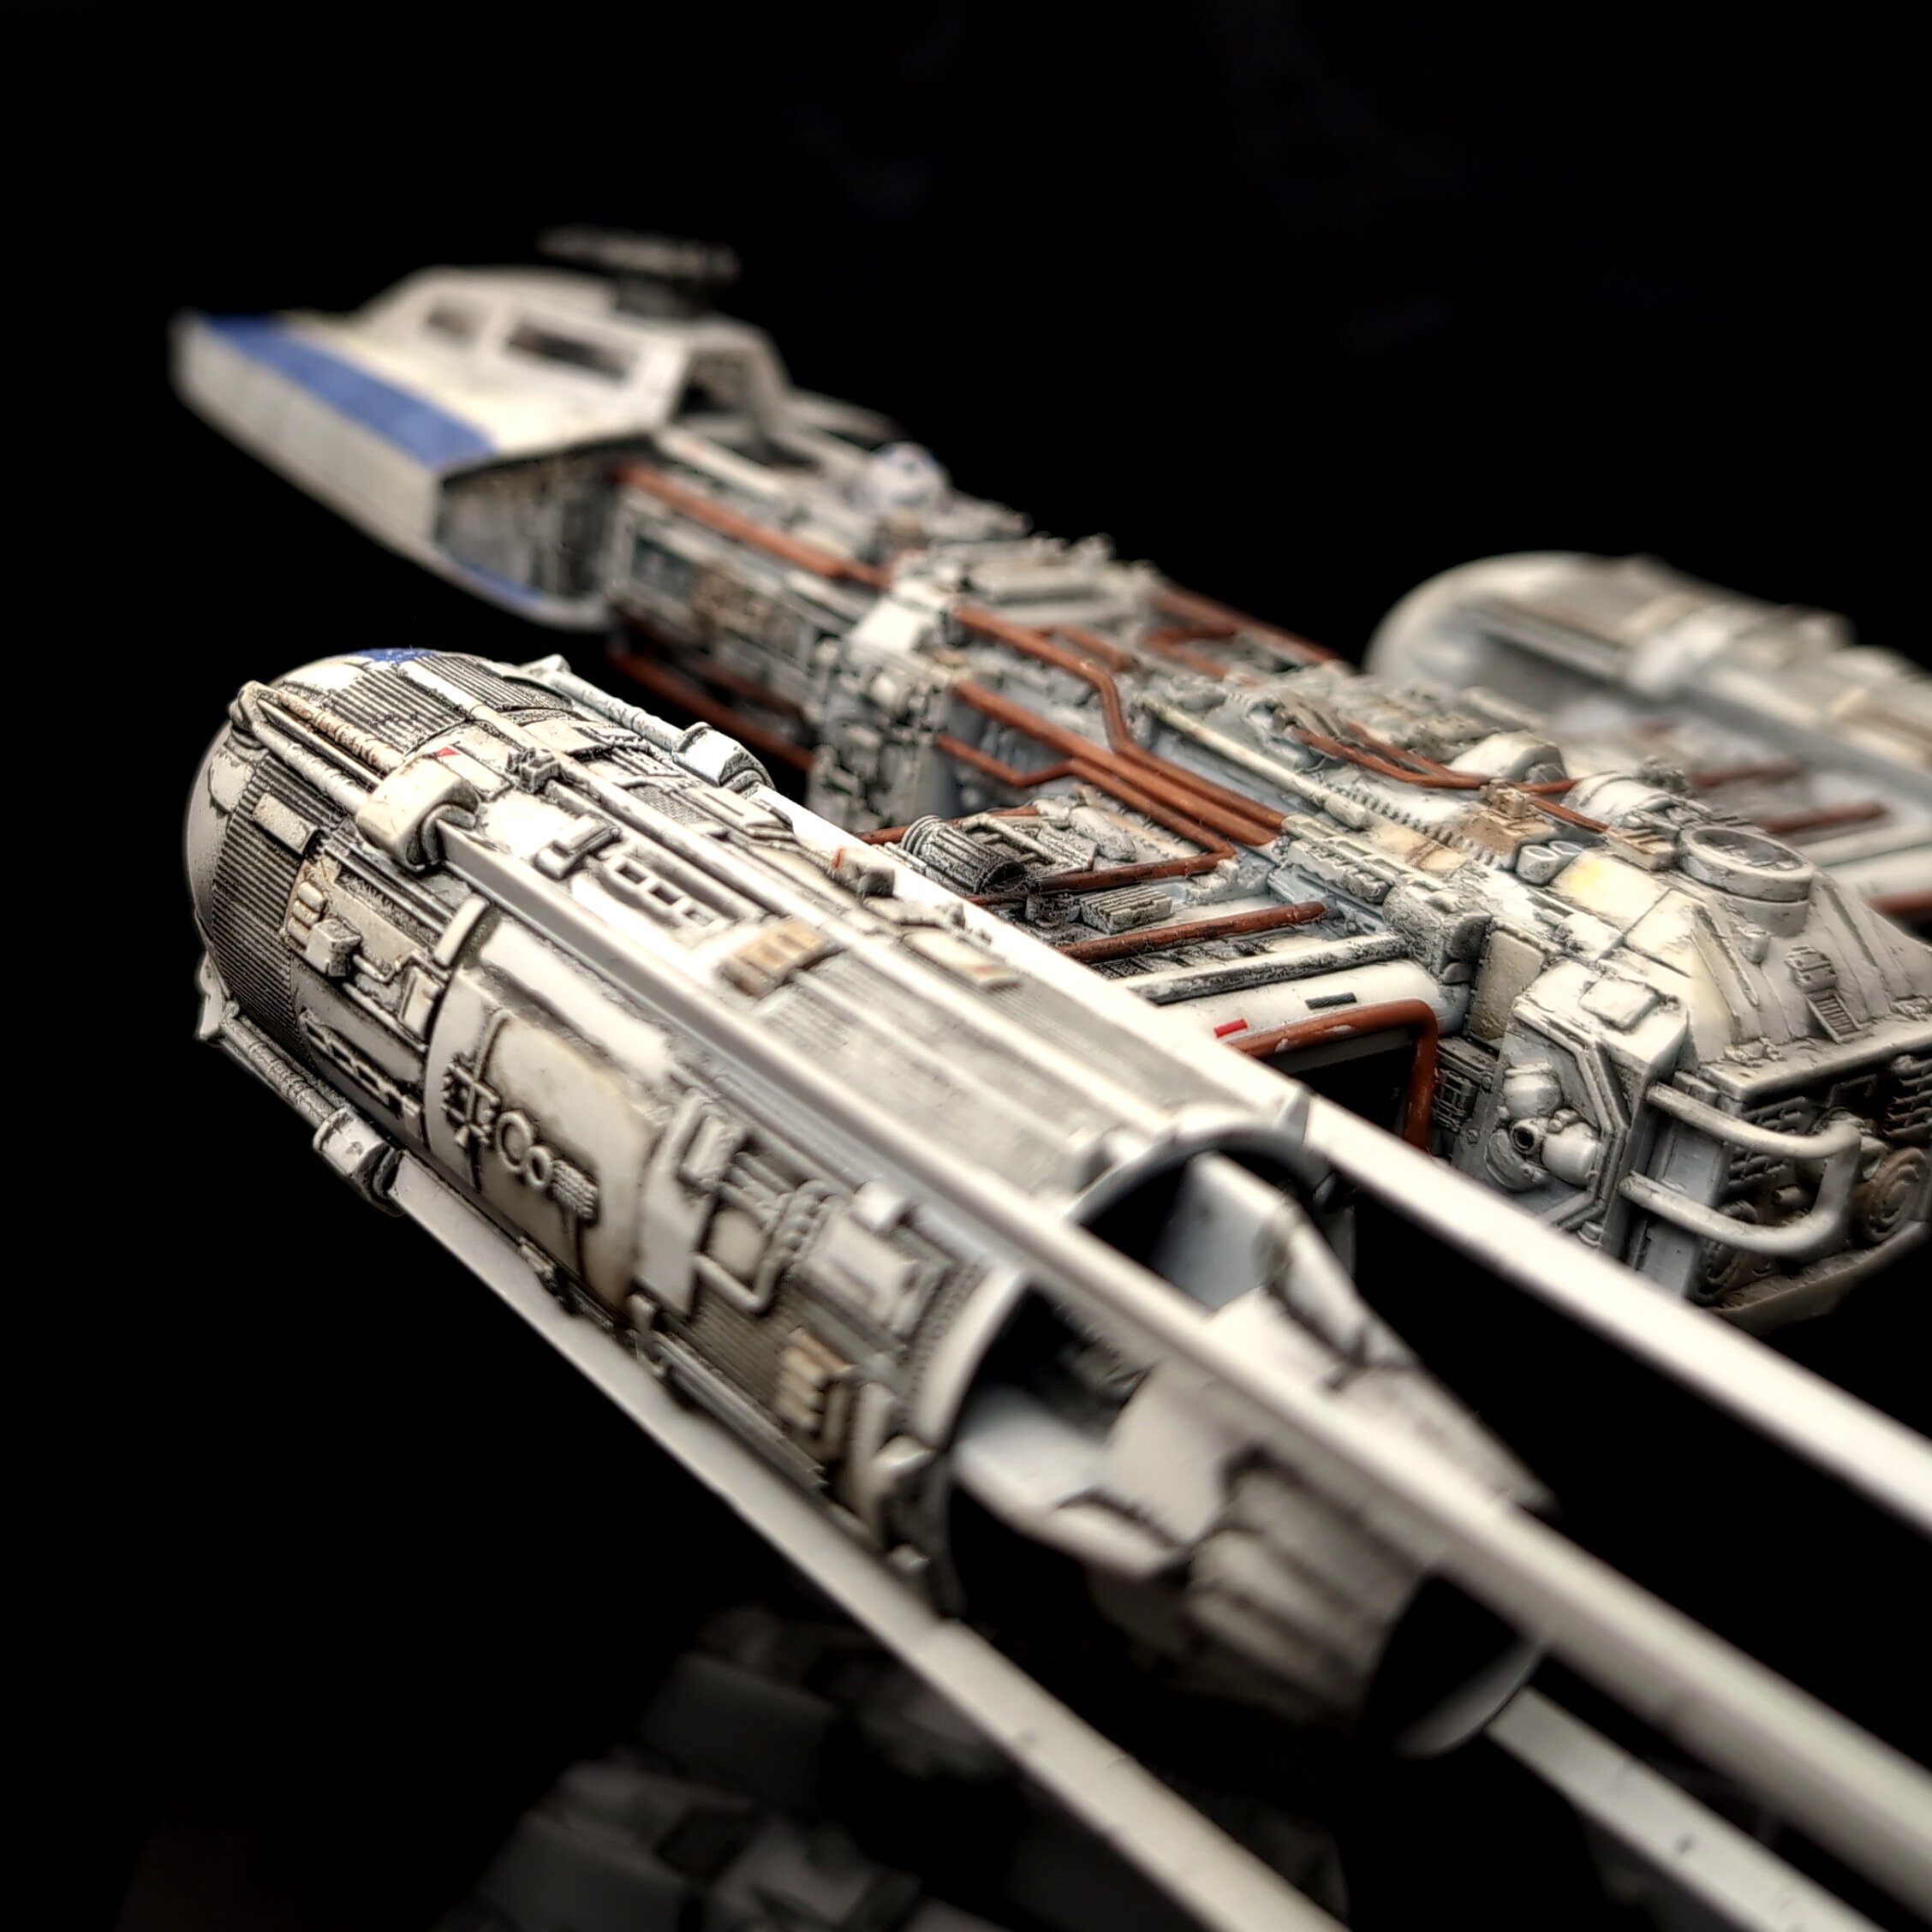
Every one of those copper pipes on the central hub needed to be clipped out, cleaned up and glued in place. There was an entire sprue of pipes! Nearly drove me to madness. Especially as they’re really thin and often need to be bent to slot into place. I count myself lucky that I only snapped two of them during the build process. But I got there in the end, a relatively simple if fiddly build in the end.
With the build done I could move swiftly onto the painting. Which I started by first priming the model with Vallejo Black Primer. The details are quite fine so I used the airbrush to lay down a thin but even layer of primer rather than risk a rattle can primer clogging up the details. I chose a black primer as the model is mostly white plastic and I would be basecoating with an off white colour, so by using black I could easily see if I had missed any areas for each step. Speaking of, once the primer had properly cured I then gave the model an all over coat of Archive-X AX-001 1975 Reefer White, the same off white colour that I had used on the X-Wing.
Unfortunately it was at this point that disaster struck and I dropped the model. Did any of the struts on the engine break? Nope. Did any more of the intricate pipes on the central hub snap? Nope. Did the chunky peg on the flight stand snap off inside the model? Yes. Yes it did. And as I was using the flight stand as a rest while the paint cured, that peg was not coming out any time soon. Used my pin vice drill and a 2mm drill bit I carefully drilled into and then through the lodged peg before inserting a 2mm wide brass rod. Not trusting any glue to hold the rod I instead locked it in place with some UV curing resin. I then drilled a corresponding hole where the peg used to be, trimmed down the rod to the appropriate length and boom. Crisis somewhat averted. The hole in the flight wasn’t particularly tight so the front heavy model ended up leaning forwards a fair bit, but it was good enough to get the painting done.

Undaunted, I cheered myself up by continuing to muse about the character of my pilot. And more importantly, their droid companion. I was very tempted to give the pilot a name in reference to Eiji Kusuhara, who was the first Asian actor to portray a Star War character with dialogue. He’s the “there’s too many of them!” Y-Wing pilot in Return of the Jedi, named as Lieutenant Gureni Telsij in expanded media.
I’m getting distracted here, I was painting the droid. Whom I shall name EK-D2 after Eiji. I didn’t want the droid to stand out too much, so I started with a basecoat of Army Painter Matt White before painting the accents with Citadel Macragge Blue.
As hinted at, I was going to do my own markings, as I would be making up my character for the pilot. Unfortunately there isn’t much open space on a Y-Wing, it’s all pipes and engines. I masked off two stripes down the front of the nose and a strip down the front of one the engines, then carefully filled the area with Archive-X AX-038 Alliance Blue. Once that was dry I masked off separate areas and repeated the process this time with Archive-X AX-022 1975 Reefer Yellow. You may or may not have noticed that this time around I didn’t use Chipping Medium. It’s good for doing a large amount of chipping all at once but I only need to weather a couple of areas, so instead I dipped a bit of sponge in some Reefer White and dabbed in on a towel until most of it was gone. I then dabbed the sponge on the Alliance Blue and Reefer Yellow areas creating a chipped effect.
My original plan was to leave everything as is and add any additional colours and visual interest with weathering. As far as I can tell, this looks to be ILM’s (Industrial Light and Magic, the company that made the props for Star Wars) methodology when it comes to painting, a few basecoats and then just weather the absolute Force lightning out of it. However, I wasn’t sure that would be enough for the Y-Wing so I made the insane decision to paint all the pipes (that came on an entire separate sprue remember!) with Scale75 Old Copper. This did a great job in breaking up all the off-white.
Before we could move onto the weathering I first needed to take care of any decals that needed to go on the hull. For the most part these are little warning symbols that go on or near to the pipes. There was also a TIE fighter kill marking that I placed near the cockpit. I didn’t even need to break out the Micro Sol or Micro Set for these. Once I had all the decals done I sealed everything down with a coat of gloss varnish.
Once the varnish had properly cured it was time to break out the enamel paints and get the model a pin wash with Ammo Black Wash. As I had broken the stand I had to work in sections because I had to physically hold the model, so I didn’t want to risk accidentally smudging or rubbing off the enamel wash before it had set properly. As I did have to keep leaving the model for the enamel wash to fully dry this part by far took the longest. I did eventually get into a rhythm of dropping the wash into the recesses and cleaning up with white spirits before leaving it for a day or two. Once I got onto the engine sections and the central hub things got a little quicker, these parts are so full of greebles and details that it was easier to give them an all over wash and then clean up the raised and flat areas. Once I had finally shaded the whole model and everything was dry I sealed everything down with a coat of Army Painter Matt Varnish. And once that was dry it was time for…
Weathering

After all that recess shading I was keen to get into the fun part, dousing my model in various weathering products. I started by getting out all my other enamel washes, of which I have three. To get things started I dabbed on Ammo Dark Brown Wash for Green Vehicles in various places across the hull, but in particular around the central hub and engines. I then repeated the process with AK Interactive Track Wash in fewer places as it’s a stronger wash and then with Ammo Streaking Grime in a few select areas as it’s a very strong colour. I gave the washes a few minutes to dry before I came back with some white spirit to blend them into the hull and tidy up anywhere that I didn’t want these washes to be. As with the recess shade above I worked in sections so as not to accidentally smudge the washes.
The additional washes added a lot of colour and visual interest to the model by I wasn’t done yet. I had recently purchased an Ammo Starship Grime Streaking Brusher that I wanted to test out. These are a little tube of oil based paint with an applicator brush, that you use to dab the paint onto the model and then use mineral spirits, or other thinner, to blend the paint into the model easily creating streaks of grime or rust. I haven’t got a lot of practice with this nor are there a lot of flat panels on the model so I used my Streaking Brusher rather sparingly. I am quite pleased with the results it produced, even if I could do with more practice.
From there I switched back to the airbrush for the final stretch. Another of Ammo’s gimmicky products that I’m a sucker for are their Shaders. These are incredibly thin acrylic paints that are used to create shadows. Or in the case of the Grime and Starship Filth Shaders I have, to add grime and filth. I carefully sprayed these on in select areas, mostly around the central hub and engine exhausts. I didn’t do too much around the flat areas as these Shaders have a habit of spider-webbing really easily.
Lastly I put some Greenstuff World Black Soot Liquid pigment in the airbrush and carefully sprayed some on the weapon tips and engine thrusters to give them a blackened appearance. I also sprayed some around the snapped pipes, that way it looked like battle damage rather than me being too rough with the delicate model.
Base
At long last, we come to finally put some paint on the base and flight stand. To start with the base and flight stand were primed black. After which I could set the flight stand aside, there wasn’t anything else that I needed to do to it. The base on the other hand was basecoated with Vallejo Game Air Cold Grey. I then used the opportunity to do some pre-shading practice while I still had some Cold Grey in the airbrush by adding some Liquitex Titanium White acrylic ink to create a lighter colour. I then carefully sprayed this on the flat panels along the top of the base.
From there I then followed the same pin washing method that I had for the Y-Wing. Firstly giving it a gloss varnish so that the wash flows better and then running a line of Ammo Black Wash into all the recesses, tidying up with white spirit as I go along. Once I was done I sealed everything down with a coat of matt varnish.
Final Thoughts
I’m really pleased with how this has turned out, even if I did have to do some emergency repairs and doing the pin wash over the course of about a week got a bit tedious. The weathering was a lot of fun and it really adds a lot of character to the model. Speaking of which, I still need to come up with a name for the pilot. I was feeling the name Jon for some reason. Jon Brass. Has a nice ring to it don’t you think? Not sure what squadron he belongs to just yet. Blue Squadron already exists as an X-Wing squadron and was seen in Rogue One. So I’m not sure what squadron he is in just yet but I do know he’s good friends with my X-Wing pilot Ada Yndell.