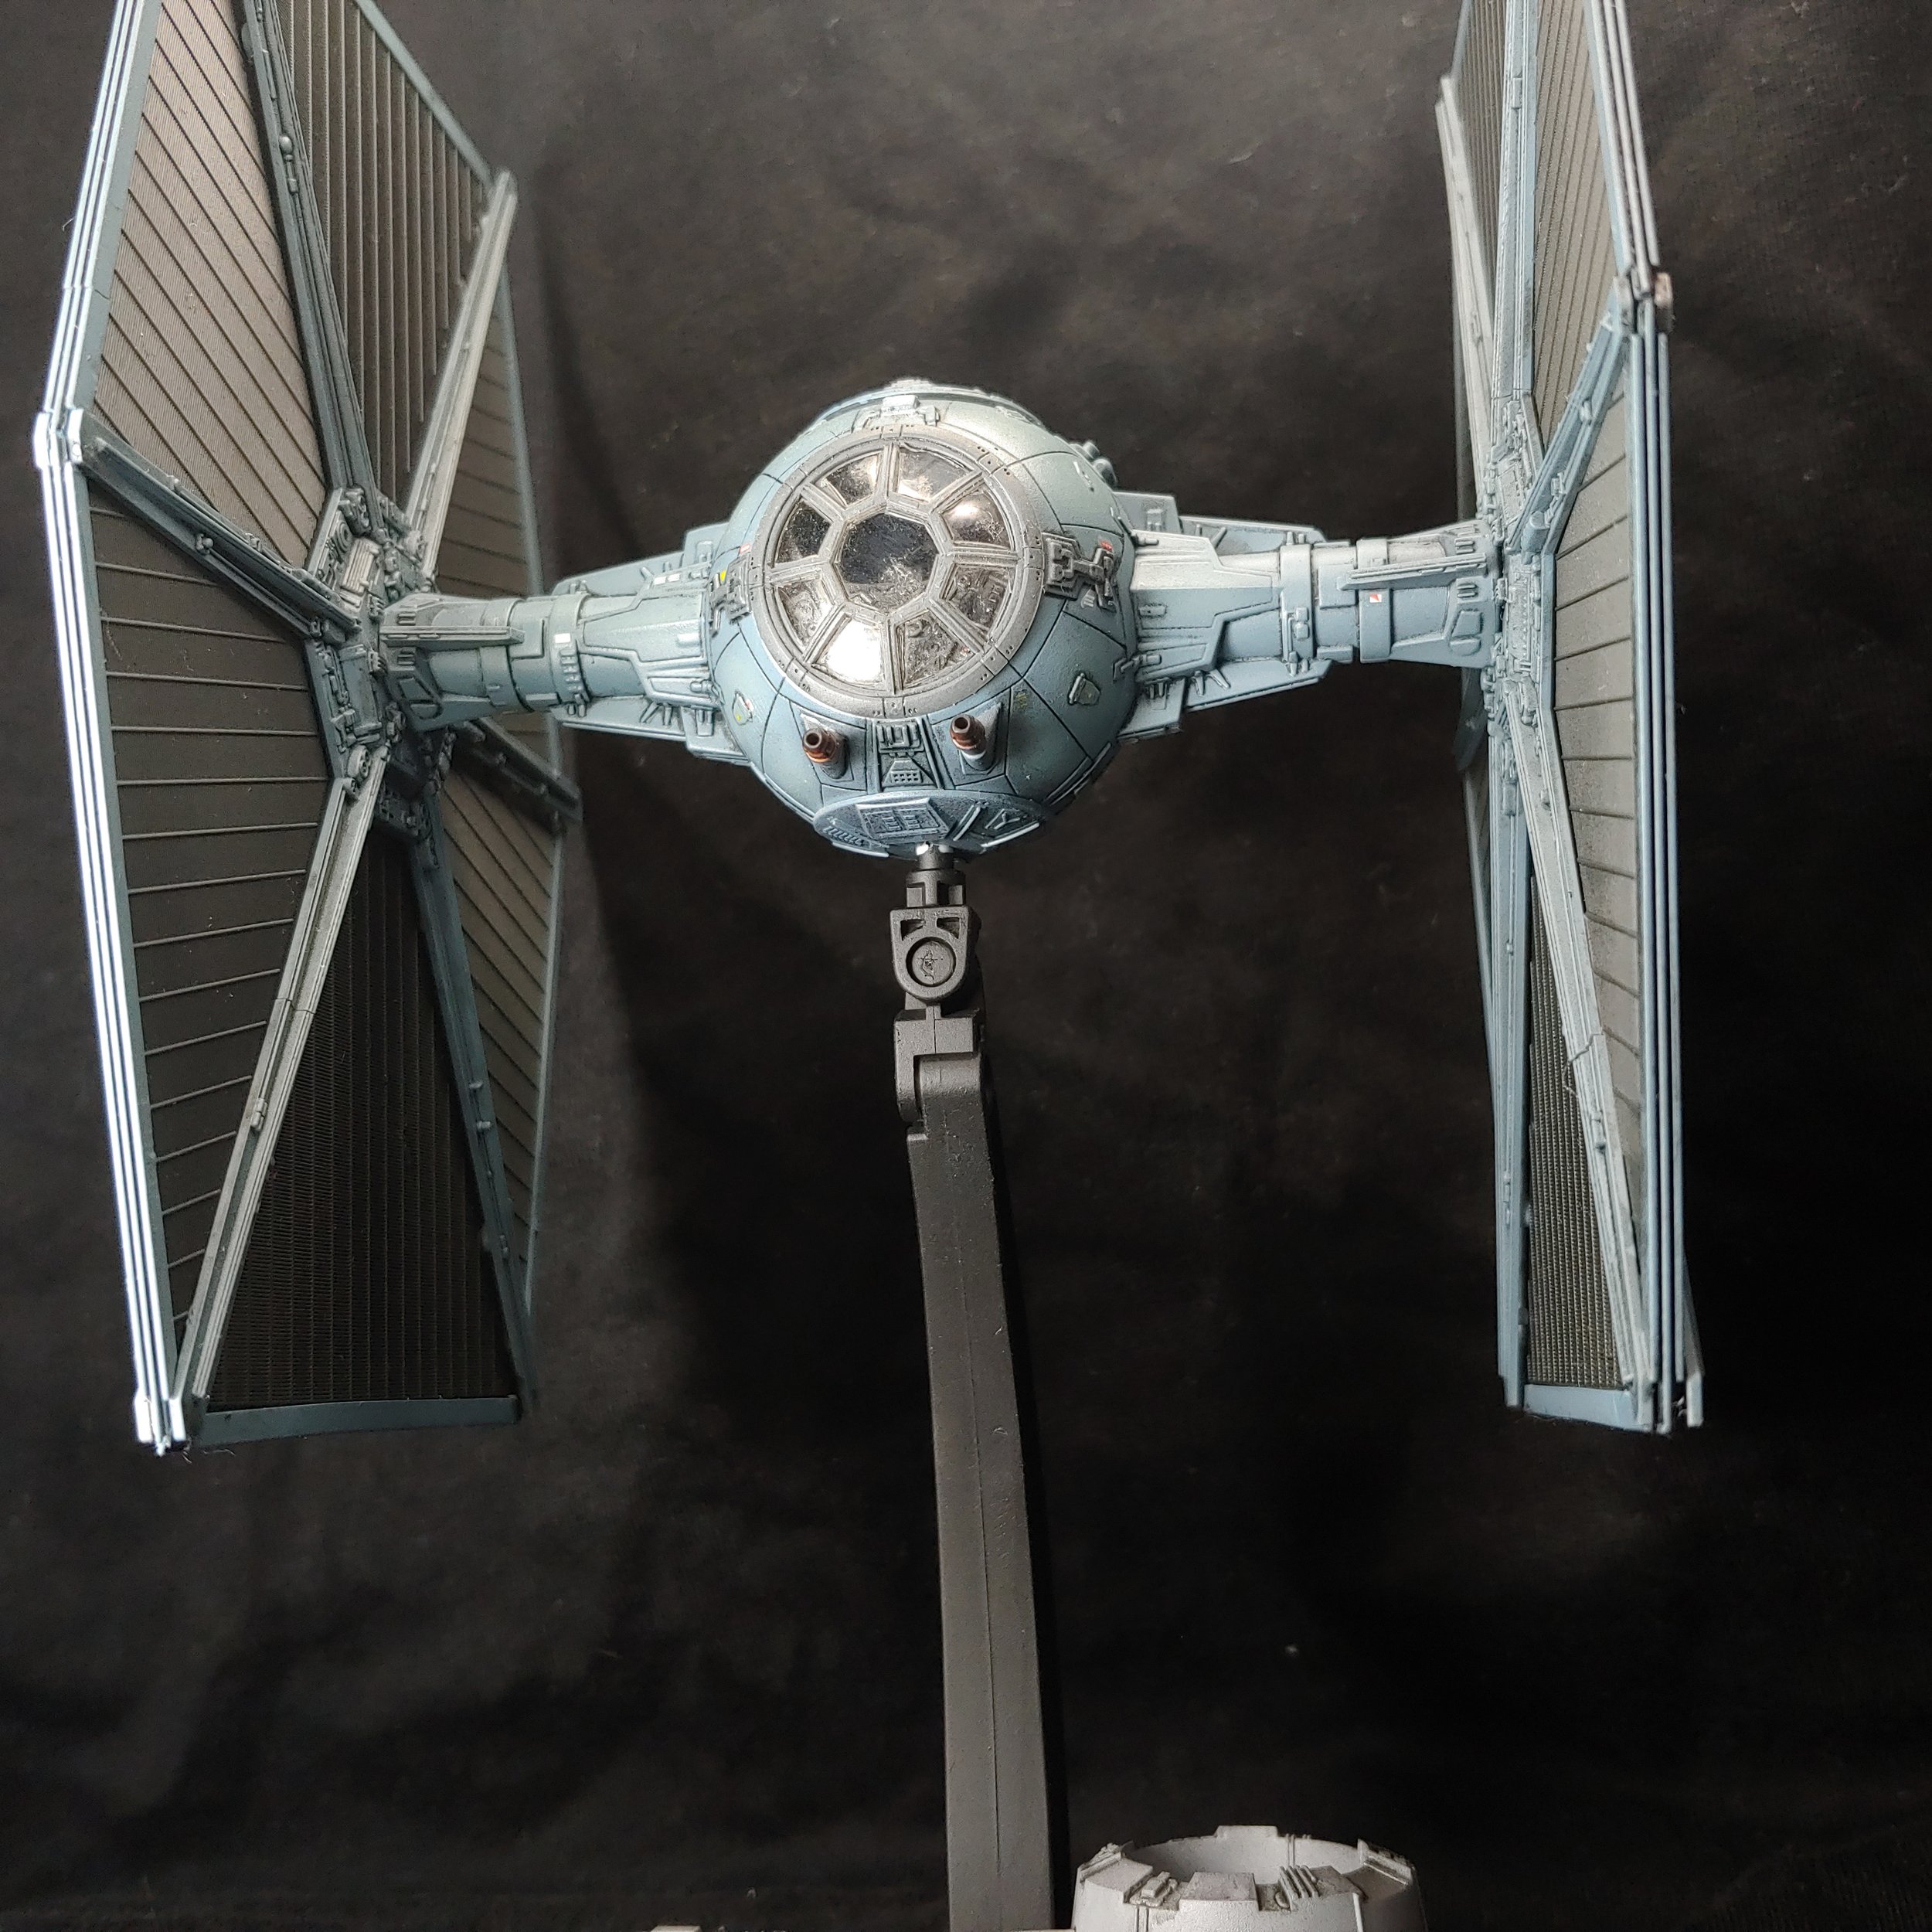
Bandai - 1/72 scale TIE Fighter
Having completed the X-Wing I was a little hesitant to start on the TIE fighter as it seemed way more complex. Plus it has a ton more windows, which made me much more nervous to start.
But in a moment of feverous hobbying I pulled the box off the shelf and just jumped right in. Not without a plan of course, I broke the model down into sections that made things easier to complete.
Cockpit

As with most aircraft I started with the cockpit and built outwards from there. I clipped the required part from the sprue and cleaned them up. Then without assembling them I primed all the parts with Chaos Black spray. The interior of the cockpit I then base coated with Army Painter Air Raven Black, TIE fighter cockpits are pretty dark in the films but I didn’t want them to be pitch black. The panel on the exterior of the cockpit I painted with Vallejo Metal Colour Magnesium.
For the pilot, I painted their flight suit with Corvus Black and the armour with Vallejo Gloss Black. The pipes to their helmet and belt buckle I then painted with Scale75 Thrash Metal. Next I used some Vallejo Scarlet Red on the buttons and eye lenses.
I picked out the remaining details in the cockpit by painting the pipework behind the pilot with Scale75 Thrash Metal and their seat with Scarlet Red. Lastly, there are a couple of parts that will extrude to the exterior of the model that I needed to paint with a couple thin coats of Archive-X Stormy Sea. I had used Archive-X paints in the X-Wing build, these are supposedly colour-matched to actual props used in the Star Wars films. So I couldn’t resist painting my TIE fighter in that iconic blue-grey colour. A lot of people think of TIE fighters as grey, but they’re only grey in A New Hope to help the models show up better against the bluescreen. From Empire Strikes Back onwards they are blue.
Last thing I needed to do before assembling the cockpit was all of the decals. As the decals go on small raised sections I didn’t need to give the entire cockpit a coat of gloss varnish, just the areas that would be getting the decals. This was easily the most tedious part of the build as there are fifteen decals that need to be placed around the cockpit, probably never to be seen again. Regardless, when all the decals were in place I gave the cockpit a coat of Matt Varnish to seal everything down.
With all that done, I could assemble the cockpit. As I was sliding the components into place I got to thinking about how I had created a character to be my X-Wing pilot: Ada Yndell and her astromech Sunny. Was this something I wanted to do for my TIE fighter and its pilot? On the one hand there are no named TIE fighter pilots in the films so I’d have a lot of freedom, but on the other hand they don’t have call signs or any personalisation on their fighters. I continued to mull this question over as I moved onto the next sections of the model.
Wings

The wings effectively consist of two parts: the large solar panels and the struts around the edges and in the middle that clip onto the solar panel. To make things easier, I left the solar panels on the sprue and primed them with Colour Forge Standard Grey. The struts were removed from the sprue, cleaned up and primed also with Colour Forge Standard Grey. I initially gave the solar panels a coat of Army Painter Air Raven Black but still wasn’t quite dark enough, so mixed in some Liquitex Carbon Black acrylic ink until I got the colour that I wanted. The struts I painted with Archive-X ILM Stormy Sea. With that done I could assemble the wings and it was here I had my only issue with the kit. These Bandai kits are precision engineered down to the nanometer, and almost all the time it means that parts join together like a dream. But that precision is a double-edged sword, if anything is off by so much as a whisker you’re in for a bad time. Which is exactly what happened when I was attaching the inner strut on the left wing, for some reason things weren’t lining up and it just wasn’t clicking into place. It took me a while to work out what I needed a bit of shaving down, but I got there in the end and soon enough both the wings were assembled.
Continuing my musings about creating a character to be my pilot, I think one of things I was struggling with was the lack of personalisation on TIE fighters. Unlike Rebel pilots, TIE pilots don’t have either own craft. All TIE fighters are identical so when it comes time to jump in the cockpit the pilots just take whatever fighter is available. Plus in the early days of the Empire all the pilots would have been clones anyway. I don’t think it’s canon anymore, but certainly during the days of the Star Wars Expanded Universe at some point the Empire moves away from clone troopers, and by extension pilots. Which is how Han Solo briefly becomes a TIE pilot before meeting Chewbacca and turning to a life of smuggling.
Central hub
Moving onto the central hub that sits between the wings and encompasses the cockpit, I started by removing the requisite parts from the sprue and cleaning them up. I left the transparent pieces on the sprue for the time being as I would deal with them later. To make things easier for myself I glued together what I could but otherwise left the two halves of the central hub separate. That way I could go ham with the airbrush without worrying about accidentally spraying into the cockpit. First things first though I needed to prime the parts with Colour Forge Standard Grey. Once that was done I then gave everything a nice even coat of Archive-X ILM Stormy Sea. On the central housing the panels are large enough that I can do some highlighting, so I mixed some Vallejo Air Sky Type S in with the ILM Stormy Sea. Sky Type S is a greenish white that was used during the Second World War by the Royal Air Force as the undersurface colour for its day fighters to camouflage them against the sky. For us, its green/blue tones make it ideal to make ILM Stormy Sea brighter without desaturating it too much. I used this mix to highlight the centre of the panels, leaving the edges the base colour. I could have been a bit more accurate with the airbrush but practice makes perfect.
TIE don’t have much in the way of markings but they do have a few panels on the central hub that are grey. I masked off the areas and carefully applied an even coat of Vallejo Model Air Dark Grey. The grey panels were a bit too small to highlight so I didn’t bother. There were a couple of areas of electronics that needed to be painted silver, namely the front of the cockpit just behind the window and the base plate that slides into the underside of the cockpit. The latter would be hidden by the panel that the flight stand attaches to but I decided to paint it anyway. So I masked the areas off and gave them an even coat of Vallejo Metal Colours Magnesium. To add some extra colour to the model I picked out the laser cannons and some random parts of the electronics with Vallejo Hammered Copper.
And then it was once again to do about a million decals. But then I suppose the rather plain exterior of the TIE fighter does need some visual interest. In any case I followed the same process as before, giving the panel that had decals on them a thin coat of Army Painter Gloss Varnish before I applied the decal. However, this time I didn’t follow up with a coat of matt varnish as there were still a few things I needed to do to the exterior. It was for this reason that I didn’t assemble the central hub just yet either.
Whilst looking into the background of TIE fighters I happened across an interesting tidbit: TIE fighters don’t have life support. The box on the pilot’s chest is their life support system, as the cockpit tends to be exposed to the vacuum of space. The Rebel pilots also have a life support system on their flight suits for emergencies but their ships do also have a life support system. Just goes to show how little the Empire cares about their personnel. And to hammer that point home, something else that Rebel ships have the TIE fighters don’t is deflector shields. Obviously in the context of the films the Empire is staffed entirely by faceless mooks that our heroes can kill with impunity but that does make it a little harder to care enough about them to create your own character.
Windows
Transparent parts will always make me nervous, but you gotta do what you gotta do. So I clipped out and cleaned up the front window and top hatch. To mask the windows I stuck a length of Tamiya Masking Tape over them and used a toothpick to push it into the corners. I can then carefully run a hobby knife around the edge of the windows, leaving the area that I want to be transparent masked.
With that done and confident that everything that needed to be masked had been masked, I primed the parts with a light grey. To minimise any chance of overspill the parts pressed into a lump of blu-tac prior to priming, that way I didn’t risk accidentally spraying the underside. Leaving the parts on their blu-tac mounts I then base coated the front window with Vallejo Model Air Dark Grey and the top hatch with Archive-X ILM Stormy Sea. Lastly, I needed to pick out a couple of panels on the top hatch with Dark Grey.
Base

The last thing I needed to do before moving onto washes was the base. And all I needed to do for that was to prime the base with Colour Forge Standard Grey and then give it an even coat of Vallejo Game Air Light Grey. In hindsight I probably could have highlighted some of the base with an even lighter grey.
Regarding my pilot, I think I have been paralysed with too much freedom. Imperial pilots and their ships, by design, don’t have any character. Although reading further into the lore, and indeed contrary to what I have written above about the Empire not caring about their pilots, apparently the training to become a TIE pilot was extremely rigorous with around ninety percent of cadets not graduating. Those that did graduate would have considered themselves the best of the best. After all the Empire doesn’t let just any dirt farmer from Tatooine jump in the cockpit!
Washes and weathering
With everything painted it was time to move onto washes. As I would be using enamel washes I first needed to give everything a coat of Army Painter Gloss Varnish. The varnish helps to protect the underlying layers of paint from the solvents I’ll be using in this step. And the glossy nature of the varnish will help the wash to flow much easier across the model. Working in sections I then used a paint brush to dab Ammo Black Enamel Wash into the panel lines and recesses, the lower surface tension of the enamel wash and the gloss finish of the model means I can let capillary action do most of the work. I could then use a brush damped with white spirit to tidy up any mess. Once I had tidied up and the enamel wash had fully cured, I sealed everything down with a coat of matt varnish. This also had the added effect of blending in the decals so you couldn’t see the edge of them.
The model was effectively done at this point, I could get everything assembled and leave it at that. But the universe of Star Wars is quite a grimey one so there was a bit weathering that I needed to do. So I loaded up the airbrush with a few drops of the Ammo Starship Filth and very carefully added in a few patches of grime on the TIE fighter and the base. I then repeated the process with the Ammo Grime Shader but this time only on the base. I certainly need more practice with fine control of the airbrush as I went a bit heavy handed in a few areas, particularly on the base. Next I used a bit of blu-tac to mask off around the weapons and then applied a bit of Greenstuff World Liquid Pigment Black Soot to the tips of the cannons and also around the engine exhaust.
With the end in sight I primed the flying stand black and carefully peeled off the masking tape on the windows, breathing a sigh of relief that nothing had slipped under the mask. From there all I needed to do was to put the sub-assemblies together. Which was a simple case of clipping the central hub around the cockpit, slotting in the window and hatch, then attaching the wings. I didn’t feel any particular need to glue them together as the push joins seemed tight enough.
Final thoughts

I have to say, I am really proud of how well this turned out. And to think I put this off for nearly a year thinking it was “too complicated”. Turned out to be a pretty simple kit in the end. I have really enjoyed both of these Bandai kits, despite my initial apprehension, so I will have to see what other Star Wars kits I can get a hold of.
Not to say there aren’t things I would have improved. I could have perhaps done a bit more weathering on the central hub, a couple of laser burns would have looked nice I think. Also I probably should have done a bit more with the solar panels, all that texture is just begging for a wash and drybrush. Something I will have to keep in mind if I do anymore kits from the TIE line like the TIE bomber or the interceptor.
I suppose now that I’m at the end of the article I should probably make a decision about my pilot. I think I shall call them Cantston, named for Colin Cantwell who provided the initial concept model for the TIE fighter and Joe Johnston who refined it to the ship we all know today. As much of the dogfighting in Star Wars takes its cues from World War 2 dog fights I was going to name them after a German fighter ace. But given their propensity for war crimes I decided against it. Instead they shall be Cantston Lyr, survivor of the Battle of Endor.